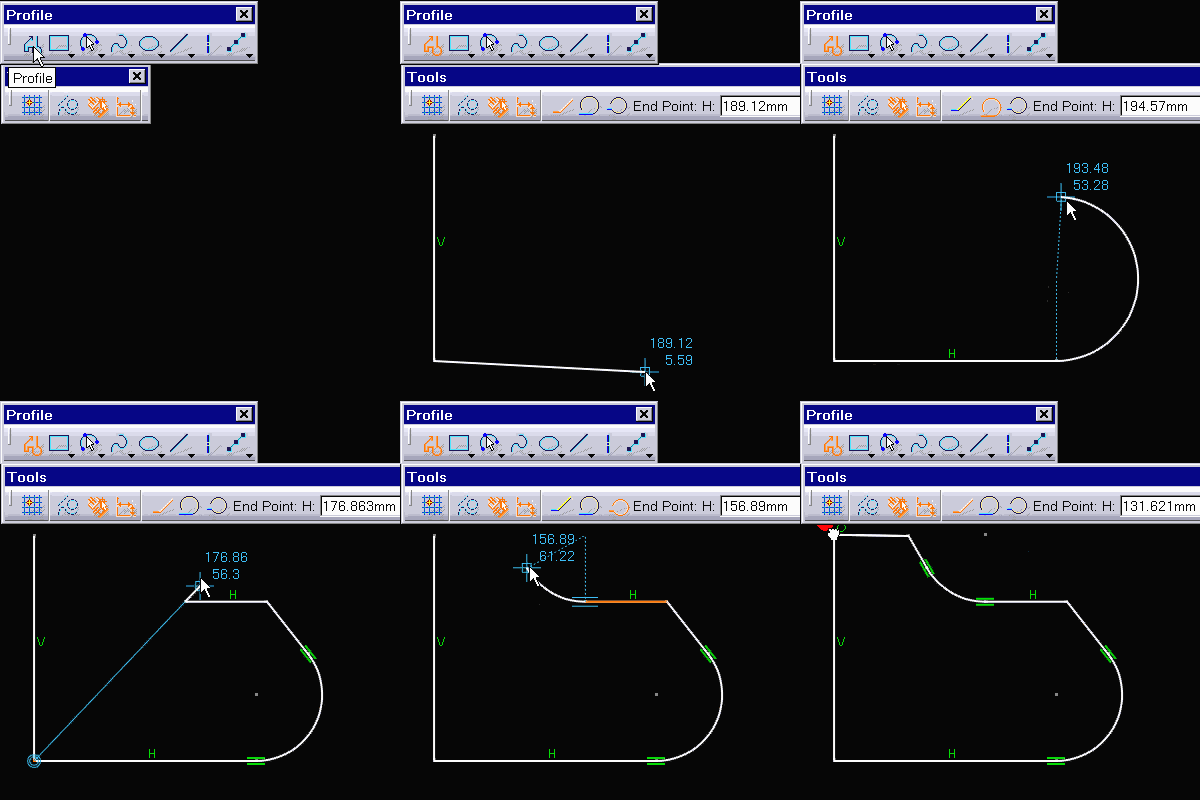
Path: Insert Profile Profile
Located on the Profile toolbar.
Use this to ...
• Create continuous lines and arcs.
Prerequisites
• You should be in the Sketcher workbench.
• The Sketch tools toolbar must be visible and Dimensional and Geometric constraints active.
Process: Creating Profiles using Lines
1. Select Insert Profile Profile.
2. In the Graphics window, pick the first point.
Or
On the Sketch tools toolbar, enter the H and V values for the first point and press TAB.
The text boxes change allowing you to define the endpoint.
3. Pick the endpoint.
Or
On the Sketch tools toolbar, enter the H and V values for the second point and press TAB.
CATIA creates the line and associated dimensions if specified using the toolbar. The text boxes change allowing you to define the next endpoint.
4. Continue creating a profile in the above manner.
5. Click Select or double-click the endpoint to exit the profile, or pick the start point in the Graphics window to close the profile.
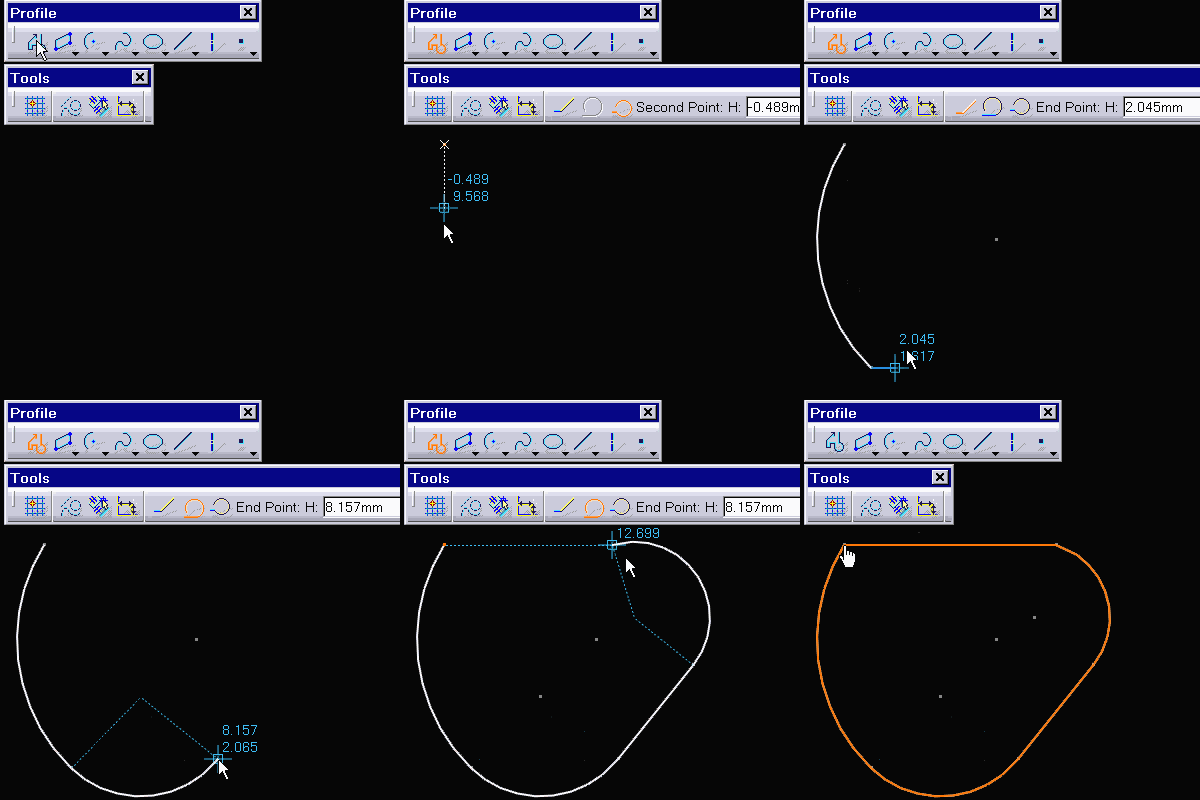
Process: Creating Profiles using Arcs and Lines
1. Select Insert Profile Profile.
2. On the Sketch tools toolbar, click Three Point Arc.
3. In the Graphics window, pick the arc start point.
Or
On the Sketch tools toolbar, enter the H and V values for the arc start point and press TAB.
The text boxes change allowing you to define the second point.
4. Pick the arc second point.
Or
On the Sketch tools toolbar, enter the H and V values for the arc second point and press TAB.
The text boxes change allowing you to define the arc endpoint.
5. Pick the arc endpoint.
Or
On the Sketch tools toolbar, enter the H and V values for the arc endpoint and press TAB.
CATIA creates the arc and associated dimensions if specified using the toolbar. The text boxes change allowing you to create the next line endpoint.
6. Pick the line endpoint.
Or
On the Sketch tools toolbar, click Three Point Arc.
Or
On the Sketch tools toolbar, click Tangent Arc.
7. Continue creating a profile in the above manner selecting Line, Tangent Arc, and Three Point Arc as required.
8. Click Select or double-click the endpoint to exit the profile, or pick the start point in the Graphics window to close the profile.

Options
Line
Creates linear geometry. This default option CATIA selects after creating each arc type.
Three Point Arc
Creates arcs by having you pick the start point, a second point that the arc passes through, and the endpoint.
Tangent Arc
Creates tangent arcs.
Tips
• To automatically select Tangent Arc, click and drag the cursor away from the created line, and release.
• When a geometric constraint symbol appears in the Graphics window, hold CTRL to lock that constraint.
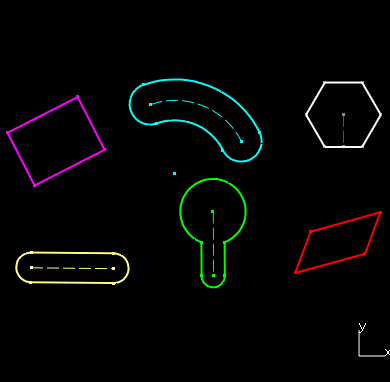
Predefined Profile Creation

Path:
Insert Profile Predefined Profile Rectangle
Insert Profile Predefined Profile Oriented Rectangle
Insert Profile Predefined Profile Parallelogram
Insert Profile Predefined Profile Elongated Hole
Insert Profile Predefined Profile Cylindrical Elongated Hole
Insert Profile Predefined Profile Keyhole Profile
Insert Profile Predefined Profile Hexagon
Insert Profile Predefined Profile Centered Rectangle
Insert Profile Predefined Profile Centered Parallelogram

Located in a fly-out on the Profile toolbar.
Use this to ...
• Create commonly used shapes.
Prerequisites
• You should be in the Sketcher workbench.
• The Sketch tools toolbar must be visible and Dimensional and Geometrical Constraints active.
• All SmartPick options must be active.
Process: Creating a Rectangle Using Diagonal Points
1. Select Insert Profile Predefined Profile Rectangle.
2. In the Graphics window, pick the first diagonal point.
Or
On the Sketch tools toolbar, enter the H and V values for the first diagonal point and press TAB.
The text boxes change allowing you to define the second diagonal point.
3. In the Graphics window, pick the second diagonal point.
Or
On the Sketch tools toolbar, enter the H and V values for the second diagonal point and press TAB.
CATIA creates the rectangle and associated dimensions if specified using the toolbar.

Process: Creating a Rectangle Using Start Point, Width and Height
1. Select Insert Profile Predefined Profile Rectangle.
2. In the Graphics window, pick the first diagonal point.
Or
On the Sketch tools toolbar, enter the H and V values for the first diagonal point and press TAB.
The text boxes change allowing you to define the second diagonal point.
3. Enter the Width on the Sketch tools toolbar and press TAB to advance to the Height text box.
4. Enter the Height on the Sketch tools toolbar and press TAB to create the rectangle and its dimensions.
Process: Creating an Orientated Rectangle Using Start Point, Width, Angle, Height
1. Select Insert Profile Predefined Profile Orientated Rectangle.
2. In the Graphics window, pick the first corner.
Or
On the Sketch tools toolbar, enter the H and V values for the first corner point and press TAB.
The text boxes change allowing you to define the second corner point.
3. Enter the Width on the Sketch tools toolbar and press TAB to advance to the Angle text box.
4. Enter the Angle and press TAB. The text boxes change allowing you to define the third corner.
5. Enter the Height and press TAB to create the oriented rectangle and its dimensions.
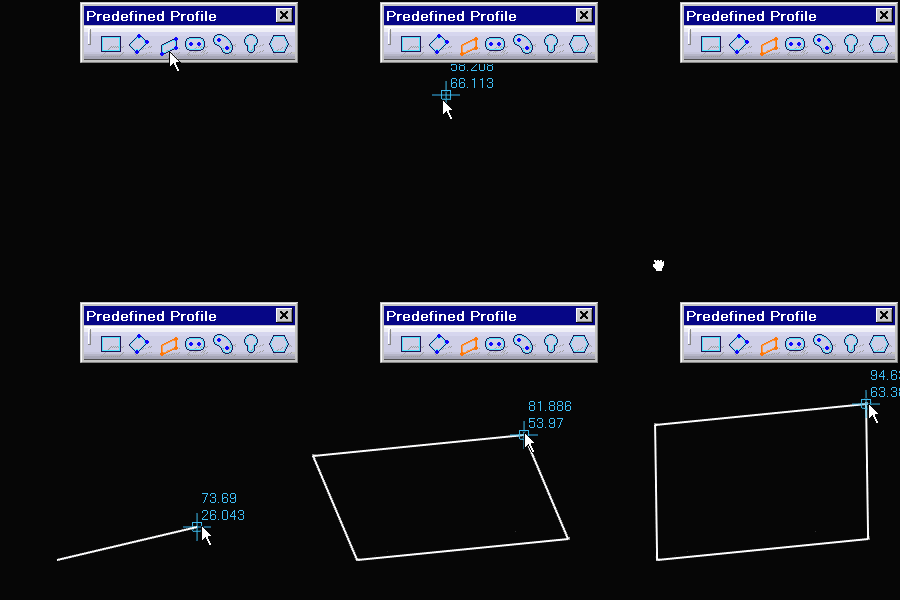
Process: Creating a Parallelogram Using Start Point, Width, Height and Angles
1. Select Insert Profile Predefined Profile Parallelogram.
2. In the Graphics window, pick the first corner point.
Or
On the Sketch tools toolbar, enter the H and V values for the first corner point and press TAB.
The text boxes change allowing you to define the second corner point.
3. Enter the Width on the Sketch tools toolbar and press TAB to advance to the Angle text box.
4. Enter the Angle and press TAB. The text boxes change allowing you to define the third point.
5. Enter the Height and press TAB to advance to the Angle text box.
6. Enter the Angle and press TAB to create the parallelogram and its dimensions.

Process: Creating Elongated Holes Using Start Point, Center Pitch, Angle and Radius
1. Select Insert Profile Predefined Profile Elongated Hole.
2. In the Graphics window, pick the first center point.
Or
On the Sketch tools toolbar, enter the H and V values for the first center point and press TAB.
The text boxes change allowing you to define the second center point.
3. Enter the pitch center distance in the L text box and press TAB to advance to the A text box.
4. Enter the angle in the A text box and press TAB. The text boxes change allowing you to define the radius.
5. Enter the Radius and press TAB to create the elongated hole and its dimensions.
Process: Creating a Cylindrical Elongated Hole Using Radii, Start and End Angles
1. Select Insert Profile Predefined Profile Cylindrical Elongated Hole.
2. In the Graphics window, pick the pitch circle center point.
Or
On the Sketch tools toolbar, enter the H and V values for the pitch circle center point and press TAB.
The text boxes change allowing you to define the start point.
3. Enter the pitch circle radius in the R and press TAB to advance to the S text box.
4. Enter the start angle in the A text box and press TAB. The text boxes change allowing you to define the endpoint.
5. Enter the end angle in the S text box and press TAB. The text boxes change allowing you to define the radius.
6. Enter the Radius and press TAB to create the circle and its associated dimensions.
Process: Creating a Keyhole Profile Using Center Pitch and Angle
1. Select Insert Profile Predefined Profile Keyhole Profile.
2. In the Graphics window, pick the large circle center point.
Or
On the Sketch tools toolbar, enter the H and V values for the large circle center point and press TAB. The text boxes change, allowing you to enter the small arc center point.
3. Pick the small circle center point.
Or
On the Sketch tools toolbar, enter the H and V values for the small circle center point.
Or
Enter the center-to-center distance in the L text box and press TAB to enter an angle in the A text box. Press TAB to change the text boxes to allow you to define a point on the small end of the keyhole profile.
4. Pick a point on the small keyhole profile.
Or
On the Sketch tools toolbar, enter the H and V values for the small keyhole profile and press TAB.
The text boxes change allowing you to define a large keyhole profile point.
5. Pick a point on the large keyhole profile.
Or
On the Sketch tools toolbar, enter the H and V values for the second radius point and press TAB.
CATIA creates the keyhole profile and its associated dimensions if specified using the toolbar.
Process: Creating Hexagons
1. Select Insert Profile Predefined Profile Hexagon to activate the Hexagon command.
2. In the Graphics window, pick the hexagon center.
Or
On the Sketch tools toolbar, enter the H and V values for the hexagon center and press TAB.
The text boxes change allowing you to define a point on the hexagon.
3. Pick a point on the hexagon.
Or
Enter the across flat dimension and the orientation angle in the appropriate text boxes and press TAB.
CATIA creates the hexagon and its dimensions if specified using the toolbar.
Process: Creating a Centered Rectangle
1. In the Graphics window, pick a center point.
Or
On the Sketch tools toolbar, enter the H and V values for the center point.
2. Pick a corner point.
Or
On the Sketch tools toolbar, enter H and V values for the corner point.
Or
On the Sketch tools toolbar, enter Height and Width values for the rectangle.
Process: Creating a Centered Parallelogram
1. In the Graphics window, pick two intersecting lines. The intersection point defines the center of the parallelogram, and the orientation angles of the parallelogram are defined by the angle of the selected lines.
2. In the Graphics window, pick a corner point.
Or
On the Sketch tools toolbar, enter H and V values for the corner point.
Or
On the Sketch tools toolbar, enter Height and Width values for the rectangle.
Options
Rectangle
Creates a rectangle by defining the start point and diagonal point. Defining the width and height, instead of defining the diagonal point, is also available.
Orientated Rectangle
Creates a rectangle at a specified angle to the horizontal sketch axis.
Parallelogram
Creates a parallelogram by defining three corner points. You can also specify the angles, width, and height of the parallelogram.
Elongated Hole
Creates an elongated hole by defining the hole centers and the radius.
Cylindrical Elongated Hole
Creates a cylindrical, elongated hole by defining the pitch circle center, the elongated hole centers, and the hole radius.
Keyhole Profile
Creates a keyhole profile by defining the hole centers and the points on the small and large sides of the profile.
Hexagon
Creates a hexagon by defining the hexagon center and the across flats dimension.
Centered Rectangle
Creates a rectangle by defining a center point and one corner point.
Centered Parallelogram
Creates a parallelogram by defining a center point at the intersection of two existing lines. The parallelogram is oriented to the selected lines. Define a corner point to finish creating a centered parallelogram.
Tips
• Use SmartPick to increase productivity.
• Pick existing geometry and use the TAB key to quickly create geometry and dimensions.